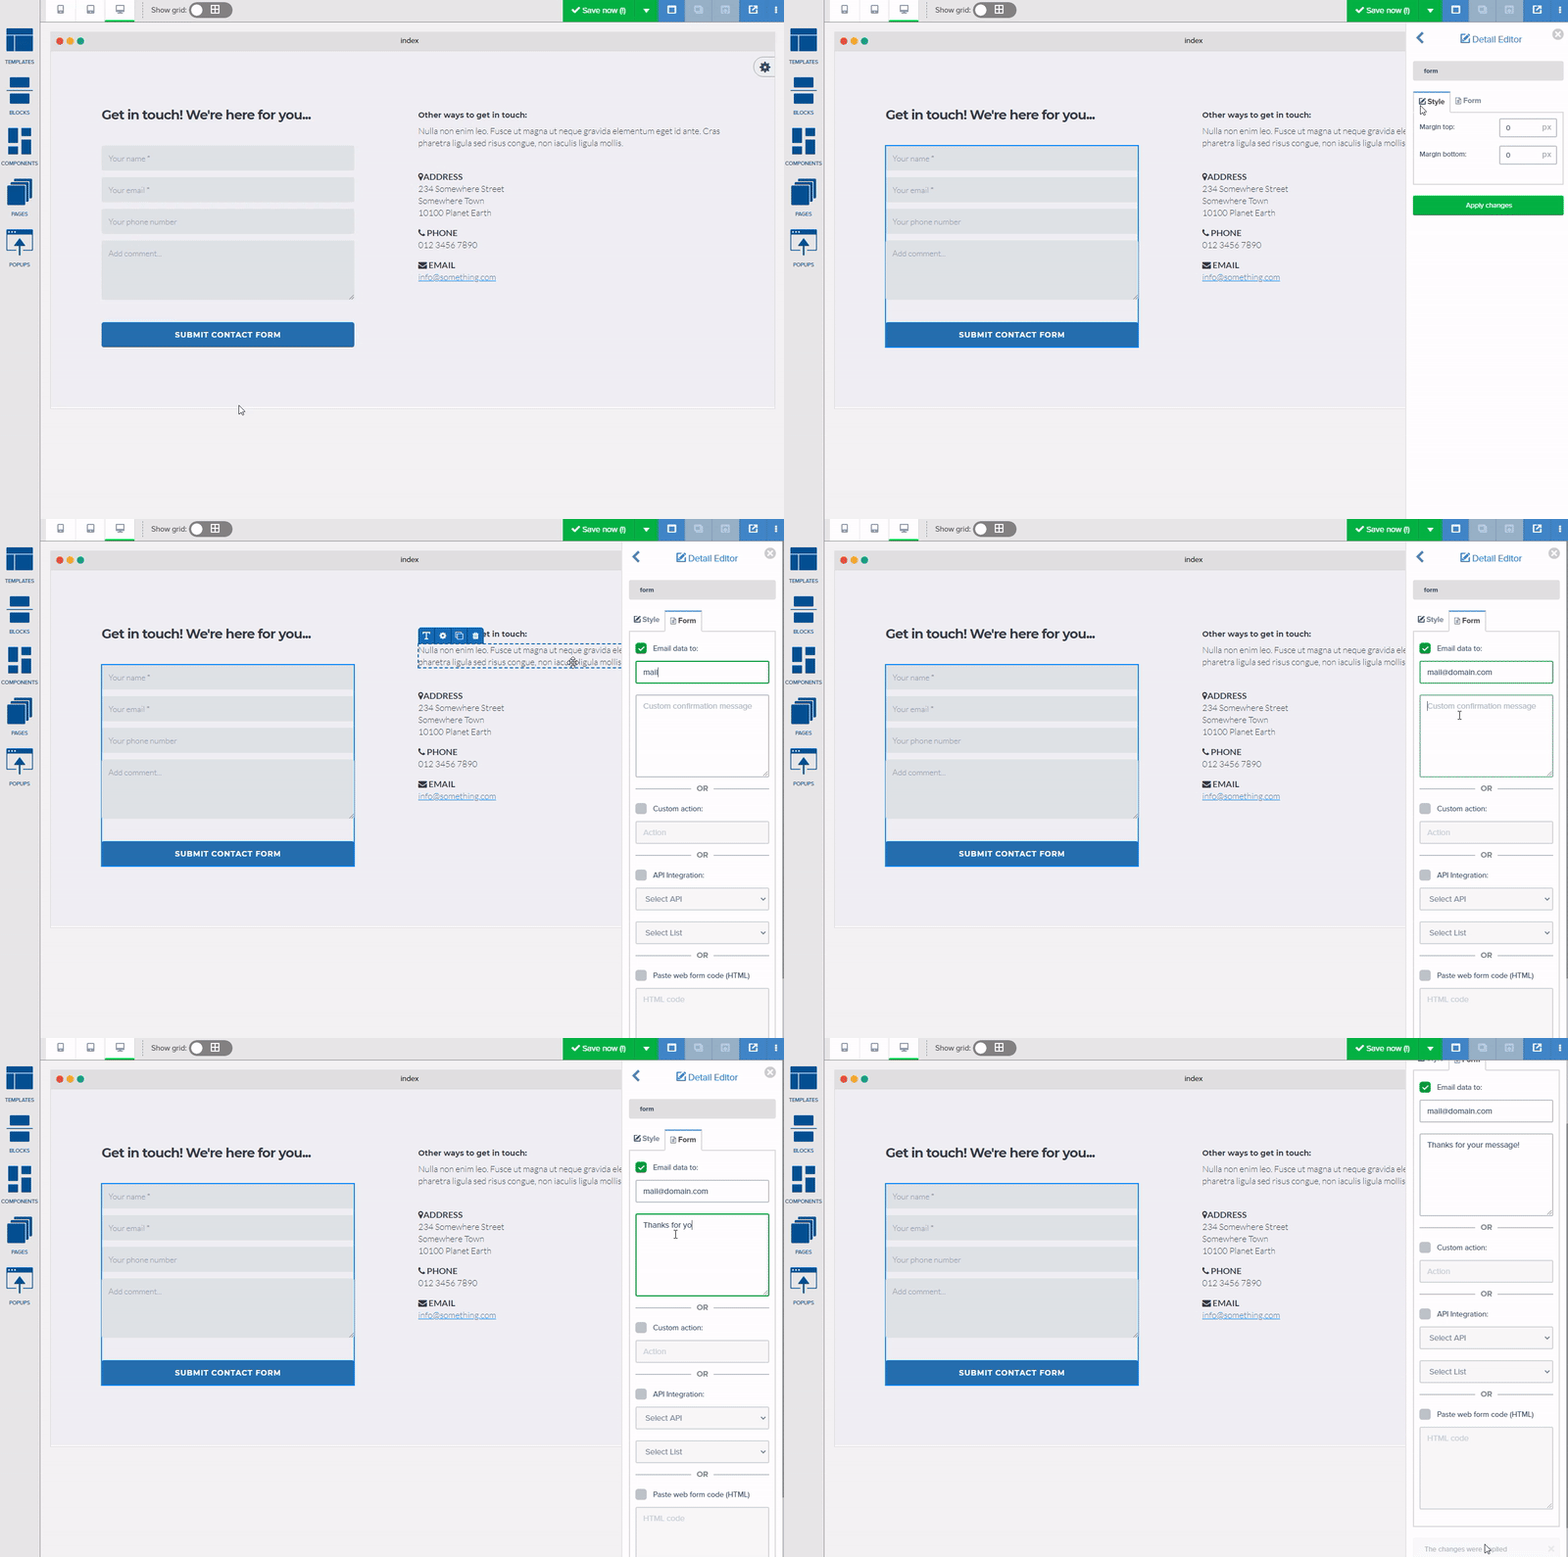
Bloxby comes with the option of handling form submissions. When the end-users opts to use Bloxby’s form handling, Bloxby will take all the submitted data and email it to the email address supplied by the end-user (Bloxby is not currently storing form submissions).
To setup a form, the end-user will need to hover the mouse cursor over the form until the the red outline appears around the form. Next, the end-user will need to click the edit icon (the icon shaped as little pen). This will bring up the style editor on the right side of the window.
Within the Form tab, the end-user can opt to either send the form data by email or to specify a custom action. Specifying a custom action will result in the value entered in the input field being inserted into the “action” attribute of the form.
If the end-user opts to send the form data by email, he or she can specify an email address to send the data to as well as a custom confirmation message (which appear after the form has been submitted). Please note the confirmation message is optional, if left empty, the default confirmation message will be displayed.

Advanced form settings
Bloxby allows for setting several additional options which determine how submitted forms are handled. These additional settings are applied by adding hidden input fields to the form. This can be done by using the HTML source code editor.
The additional options currently available are the following:
- Custom subject
Sets a custom subject for the email sent by the API<input type="hidden" name="_subject" value="My awesome subject"> - Custom reply to
Sets a custom reply to value for the email sent by the API<input type="hidden" name="_replyto" value="[email protected]">Instead of specifying a static custom “reply to” address, you can also choose to use an email address entered by the user of the form. In order to do this, give your custom “replyto_” field a value of “%” followed by the name of the field. Let’s assume you have a field named “email” which value you’d like to use for your custom “reply to” field, then you’d give you “reply to” field a value of “%email”.
<input type="hidden" name="_replyto" value="%email"> - Redirection
Allows you to specify a URL to redirect the user to after successfully submitting the form and sending out the email<input type="hidden" name="_after" value="http://google.com"> - Honey pot SPAM detection
The honey pot field adds an additional spam protection to your forms. By inserting this hidden field, you’re allowing the API to detect automated submissions. If the API fields a value inserted into the honey pot field, this is a strong indication that the submission as automated and it will be marked as spam. Please note that the “value” attribute of this field must remain empty.<input type="text" name="_honey" value="" style="display:none"> - CC and BCC recipients
Use the following syntax to specify one or more CC and/or BCC recipients. Please note the name of this field is “cc[]” or “bcc[]”. This allows you to specify any number of entries, rather then just one.<input type="hidden" name="cc[]" value="[email protected]"> <input type="hidden" name="bcc[]" value="[email protected]"> - Field validation
Bloxby comes with built-in form validating capabilities. You can specify a variety of rules for your data; and if the submission does not pass the validation process, the user will be shown a message detailing which validation rules were not passed.
The validation syntax is simply and straightforward. You simply add a hidden field for each form field you’d like validated, and you name this hidden field “_valid[field_name]” where you replace “field_name” with the name of the field. Please see the basic example below:<form action="/sent/api/[email protected]" method="post"> <input type="hidden" name="_valid[name]" value="required"> <input type="hidden" name="_valid[email]" value="required|valid_email"> <input type="hidden" name="_valid[message]" value="required"> <input type="text" name="name"> <input type="email" name="email"> <textarea name="message"></textarea> <input type="submit" value="Send"> </form>In the example above, the form contains three fields to be filled out by the user: name, email and message. Accordingly, three hidden validation fields have been added to the form as well. The “name” field must validate as required, meaning it can not be left empty. The same applies to the “message” field. The “email” field is also required, and in addition it must validate as a proper email address. If any of these requirements are not met, the user will get an error message explaining what is wrong with their data. Below you’ll see an overview of all available validation rules:

Does these values get stored anywhere in the database? For example, if the “to” email field value is stored somewhere?
No, currently form data is not stored anywhere; it only gets send by email